Data Collection
The Data Collection tab allows you to control what type of data is collected by the Create Wizard of the EasyLife 365 Mail when a user creates a mailbox or distribution list.
Email Naming Convention
Admins can control how email addresses are formatted and validated during the resource provisioning process. This helps ensure consistency, prevent invalid characters, and meet organization-specific naming conventions.
 |
|---|
| Email naming convention section |
Naming Convention
The Email Naming Convention field allows you to define the structure of email addresses, providing flexibility in how they are generated. By using a combination of user input and placeholders, you can create a consistent and customizable email format for your organization.
How It Works
- Customizable Structure: The naming convention is defined using placeholders that determine the format of the email address.
- User Input Variable: The
{input}placeholder represents the value entered by the user during email creation. - Dynamic Placeholders: You can also use other placeholders to automatically include user attributes, such as company name.
Example Format
{user:companyname}-{input}
Example Placeholders
{user:companyname}: Automatically inserts the user's company name.{input}: Accepts user-provided text.- Additional placeholders can be used depending on your system configuration.
Practical Usage: Shared Mailbox Provisioning
When setting up a shared mailbox, this naming convention automatically formats the email address based on user input and other placeholders.
Example Scenario:
- Naming Convention:
{user:companyname}-{input} - User Input:
support - User’s Company:
Nuboworks - Domain:
example.com
This configuration generates the email address as follows:
nuboworks-support@example.com
Text Transformation
Text transformations are a powerful tool for maintaining consistency and standardization in email addresses. By applying text transformation rules, you can automatically modify the format of user input, ensuring that all email addresses follow a consistent style. These transformations can be applied to control the text case (uppercase or lowercase) and replace specific characters, such as spaces, with predefined symbols.
1. Enforce Text Case
To maintain consistent formatting for email addresses, you can apply text transformation rules to automatically adjust the text case of user input. The following options are available:
- Convert to Lowercase: Ensures all characters in the email address are lowercase.
- Convert to Uppercase: Forces all characters to appear in uppercase.
- No Conversion: Retains the original case of user input without any modifications.
2. Replace Spaces with Custom Characters
Spaces in user input can be replaced with specified characters to ensure compatibility with email address formatting. You can define the character or string that will replace spaces, such as:
- Dot (
.) - e.g.,john.doe@example.com - Hyphen (
-) - e.g.,john-doe@example.com - Underscore (
_) - e.g.,john_doe@example.com
Ensure that the replacement character is valid for use in email addresses and aligns with your organization's email naming conventions.
Validation Settings
Validation rules provide administrators with precise control over the characters and format allowed in email addresses. This ensures that all email addresses adhere to your organization’s standards and reduces the risk of invalid entries.
1. Custom Validation Pattern (Regex)
Administrators can choose from predefined validation templates to enforce common patterns, making configuration quick and easy:
- Alphabet Only: Only allows letters (A-Z, a-z). No numbers or special characters.
- Alphanumeric Only: Permits letters and digits (A-Z, a-z, 0-9). No special characters.
- Alphanumeric and Selected Special Characters: Allows letters, digits, and specific symbols (
_ . % + -). - Firstname.Lastname Format: Only alphabetic characters with a single period separating first and last names.
For advanced scenarios, administrators can define a custom regular expression (regex) to match any specific pattern required.
2. Custom Error Message
Optionally, you can specify a custom error message to display when the validation fails. If a custom message is not provided, the system will use its built-in error messages.
3. Test Validation
To ensure your validation rules are correctly defined, you can use the Test Validation feature. This allows you to enter a sample email value and immediately verify whether it matches the active regex rule, providing instant feedback for configuration adjustments.
Configuration Examples
| Requirement | Configuration Section | Configuration Example |
|---|---|---|
| Only allow lowercase email addresses | Text Transformation | Enforce Text Case → Convert to Lowercase |
| Convert all input to uppercase | Text Transformation | Enforce Text Case → Convert to Uppercase |
| Replace spaces with dashes | Text Transformation | Replace Spaces With → - |
Email format like company-input | Email Format | Naming Convention → {user:companyname}-{input} |
| Only allow alphabetic usernames | Validation Settings | Template → Alphabet Only |
Allow email format like firstname.lastname | Validation Settings | Template → Firstname.Lastname Format |
| Allow numbers but no special characters | Validation Settings | Template → Alphanumeric Only |
| Allow input starting with "emp" followed by digits | Validation Settings | Custom Regex → ^emp[0-9]+$ |
Properties
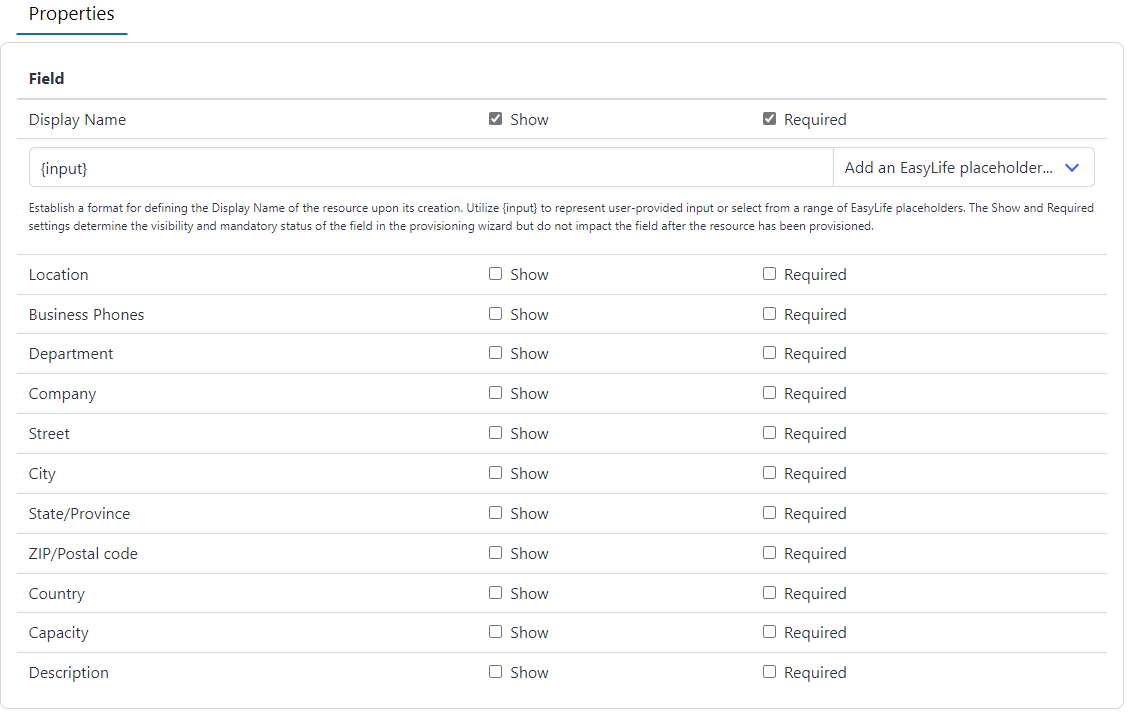
This section provides administrators with greater flexibility when creating templates in the EasyLife 365 Mail App. Administrators can determine whether a field is visible, mandatory, or optional during the provisioning process. The property fields that can be configured vary from one type of template to another.
When fields like Display Name and Description are configured to be visible, they also provide an option that allows administrators to indicate the naming convention that will be used for the specific field during the provisioning of a resource using that template.
The image below shows the fields that can be found in equipment mailboxes.
 |
|---|
| Properties for Equipment Mailboxes |
The Show and Required settings apply to all fields except Display Name, impacting both resource provisioning and resource modification. For Display Name, these settings apply only during provisioning, where the field is mandatory and visible after the resource is created. Below, we will explore how to configure an optional Display Name.
You can choose to make the Display Name optional for Shared, Room, and Equipment Mailboxes in the creation wizard. If left blank, the system will use the email address as the Display Name. The "Show" and "Required" settings only affect the visibility and necessity of the field during wizard run and do not apply after the mailbox modified.
Fields
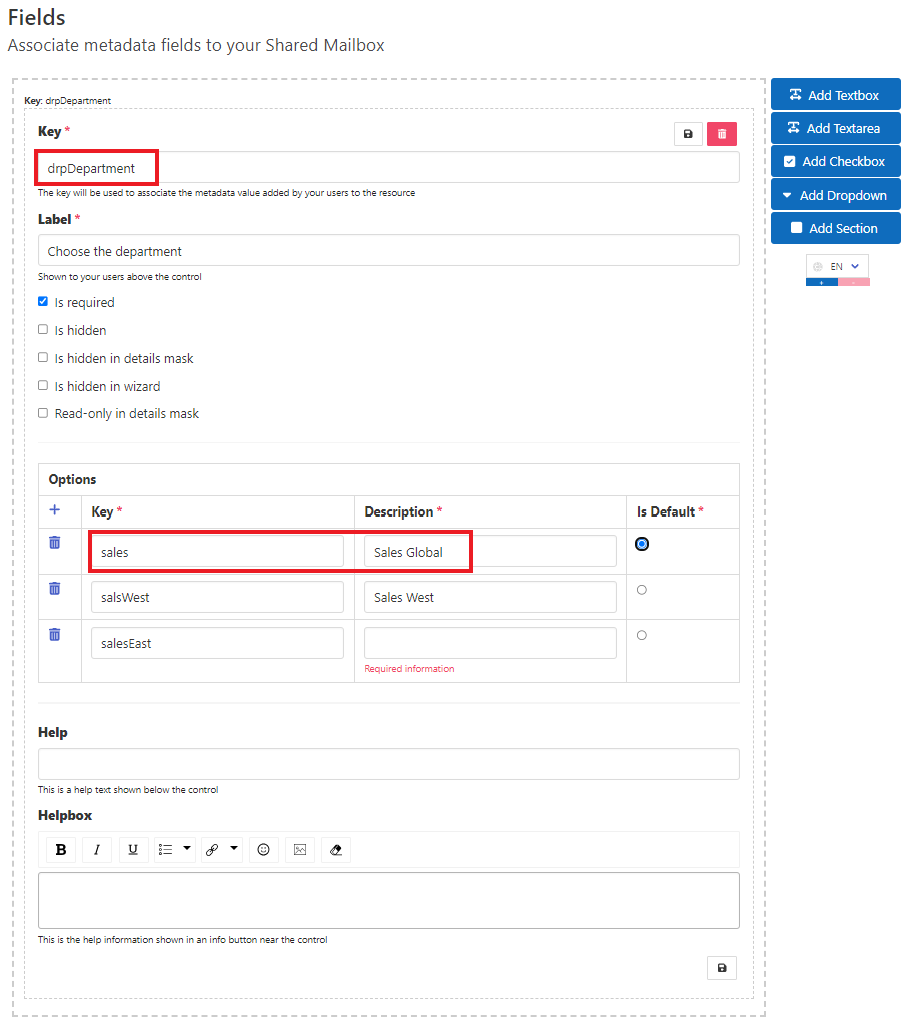
The Fields section allows you to create and associate metadata to your resources. EasyLife 365 Mail supports text boxes, text areas, check boxes, and dropdown lists for data collection. In the following example we create a new dropdown list with the internal name drpDepartment. The Label is displayed as information for user in the EasyLife 365 Mail App.
Under options we define the available options for the dropdown list. The user will see the text in the Text part and the drpDepartment will contain the Key.
 |
|---|
| EasyLife 365 fields |
Web hooks
You can specify a webhook that is triggered whenever a user modifies the metadata in the EasyLife 365 Mail App. This allows you to track changes performed by your users in an external system.